Embracing Evernote: The Top 6 Evernote “A-ha!” Moments
Do you have the sneaking suspicion that you might be underutilizing Evernote?
Do you ever wonder whether there are ways to make using Evernote a little bit….easier?
I asked some of my students and my coaching clients what their biggest “A-ha!” moments were with Evernote, and I loved their responses.
These were the “tipping point” realizations that unlocked the true power of Evernote for my students. When they started using these tips, they moved beyond viewing Evernote as an occasional note-taking app – and they actually starting engaging with Evernote as an important cornerstone in their daily productivity.
If you already use Evernote, you may not be aware of some of these critical tips – and they can help you become an Evernote power user. If you’re new to Evernote, these suggestions can help you get organized in the application, so you can hit the ground running in your Evernote journey.
1. To be productive with Evernote, use the full desktop app.
Here’s the problem: You probably heard about Evernote when you were at a conference or a meeting, and perhaps you initially downloaded the mobile app and starting experimenting with it on your phone.
But you can only harness the real power of Evernote when you download and use the desktop application.
The Evernote app on your phone is best for capturing data and retrieving your information when you need it.
You can do those tasks on your desktop app, too – but you should definitely be setting up your organizational structure and managing the organization of your notes from your desktop. The structure you create on the desktop app will pull through to your phone.
If you’re trying to organize your Evernote account using your mobile device, you’re going to be frustrated – but if you stick to these simple rules, you’re going to have a much easier time utilizing the full functionality of Evernote.
You can log into your Evernote account at any time, using the web – but using the browser-based application doesn’t give you the full experience, because it doesn’t have all the features that are included in the full desktop application. Use the web-based application as an additional tool in your Evernote toolbox….not as your primary Evernote platform.
Bonus: Download my free guide to learn more about this tip.
2. Use Evernote’s left sidebar area as your primary navigation tool in the desktop app.
Another Radical Productivity with Evernote member, Zack, had a major breakthrough about navigation in Evernote that helped him work faster and more efficiently.
One of the best ways to get truly fluent in Evernote (and speed up you work exponentially) is to set up your left-hand navigation bar to give you quick-and-easy navigation within the application.
These three changes to your left sidebar will skyrocket your Evernote productivity:
1. Toggle on the “notebook list” in your sidebar so you can navigate to any notebook in just one click.
2. Show the “note counts” under each notebook in the sidebar, so you easily see how many notes you’ve created in each one.
3. Create shortcuts in your sidebars to the notebooks you use the most.
3. Use stacks to organize your notebooks and get rid of clutter.
Here’s a screenshot of some of my current Evernote notebooks:
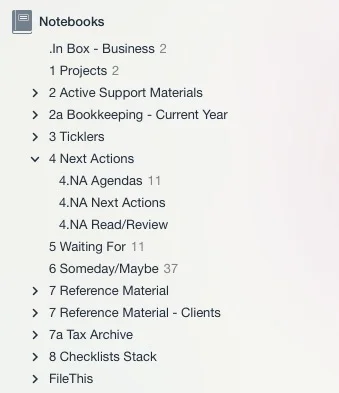
See those groups of indented notebooks under “4 Next Actions”? Those are notebooks grouped in a stack.
The main building blocks in Evernote are Notes, Notebooks, and Stacks – and these tools help you organize your data in accessible ways within the application. Stacks are simply groups of notebooks, and they allow you to put your notebooks into visually organized categories.
You can picture notebooks as manila folders, and stacks as filing cabinet drawers in your office.
Stacks allow you to easily collapse the amount of notebooks you’re viewing in your Evernote interface. I have close to 500 notebooks in my Evernote app, but I keep everything visually organized into only 9 stacks and some additional notebooks – and I can close up my stacks to get a clearer view of where I’m going in my list of notebooks.
People often underestimate the amount of overwhelm they feel when they’re bombarded with constant visual clutter – and keeping your notebooks organized in stacks is a great way to keep things neat and tidy in Evernote. Using stacks is just like keeping your physical desk clean in your office, and it can help you get more done and reduce distractions as you’re working.
Bonus: Download my free guide to learn more about this tip.
4. Rename your default notebook to ".In Box".
When you’re first getting started with Evernote, your default notebook is called, “First Notebook”. When you create a new note, Evernote automatically puts that note in your default notebook, unless you specify otherwise.
I recommend renaming that default notebook, and calling it “.In Box”.
When you rename your default notebook, it shifts your mindset, which will make organizing and finding things in Evernote a lot easier.
In the physical world, picture what happens when someone puts a piece of paper in the inbox on your desk. When an item goes in there, it means it needs to be processed, sorted, and placed somewhere else. Your inbox is just a temporary holding spot for that item.
When you apply the “inbox mindset” to your default notebook in Evernote, you’ll be more likely to process and sort those notes into other notebooks.
Your default notebook won’t become a dumping ground for everything that come in, because you’ll know what your job is to clean out your inbox on a regular basis – but you can use it as a temporary holding space for notes in the meantime.
I clip and save 90% of my notes directly into my .inbox notebook, and then I file those notes in batches on a regular basis. I know a lot of quick and easy ways to file notes, so I can make short work of that filing once I have time.
Important note: I do recommend that you call your default notebook “.In Box”. When you add the dot at the beginning of the name, your inbox will always be at the top of the list of notebooks in your Evernote interface. It’s a naming convention hack that I talk more about in this post.
Bonus: Download my free guide to learn more about this tip.
5. Use note links to create structure in your Evernote account.
I’ve noticed a common problem when people start using Evernote: Their account is a blank slate, with no built-in organization, and that can throw people for a loop.
They look at their blank slate account and think, “What the heck can I even put in here? How do I keep it organized? And how do I avoid turning Evernote into a black hole, where stuff goes in, but never comes out?”
Creating note links allows you to hyperlink between any two notes in your account, and it creates structure in this flexible and unstructured platform. Evernote’s flexibility is a double-edged sword. It is purposefully flexible, and that is a huge asset to users allowing for a massive variety of use cases, but this flexibility can be a challenge when you’re first getting started.
Note linking is the single skill that converted me from a casual Evernote user into a lifetime Evernote devotee. The structures I can create with note linking allow me to navigate quickly to what I’m looking for at any time, from anywhere, and on any device. It was a major “a-ha” moment for me when I realized how this process works, and what note links could do for me.
Bonus: Download my free guide to learn more about this tip.
6. “BCC” your Evernote account on your emails for a quick and easy way to create notes and keep your inbox clear.
You might already know that with paid accounts you can send email notes directly to your Evernote account from your email inbox.
Carolyn, one of my Academy members, takes that process one step further. She adds her Evernote email address to the “BCC” field when she is answering emails. It’s a fast and super-simple way to keep her email inbox clear and create notes as she’s corresponding with colleagues and clients. It saves her time, because she can skip the extra step of having to send a separate email to her Evernote account where she retains it as supporting material to the project she is working on.
Your Own “A-ha” Moments in Evernote
One thing I love about my work is how often my clients say, “Wow! I didn’t know Evernote could do that!” I love hearing this, because I know those realizations will often lead to major boosts in that person’s productivity.
We’ve been talking about some of the biggest light bulb moments my students have experienced when they’re working with Evernote. Once they implement these ideas, and start using them on a regular basis, they often say “This makes things so much easier!”
Have you had other “a-ha!” moments that I haven’t mentioned here? Tell me about yours in the comments below.